Installing a slipway winch is a critical task for ensuring efficient and safe boat launching and retrieval. This comprehensive guide will walk you through each step of the process, from initial planning and site preparation to the final testing and maintenance.
Step 1: Planning and Preparation
Assess Your Needs
Determine the Load Capacity
Calculate the maximum load the winch needs to handle, including the heaviest boat and any additional equipment. Overestimating this load is better than underestimating it to ensure the winch can handle any situation.
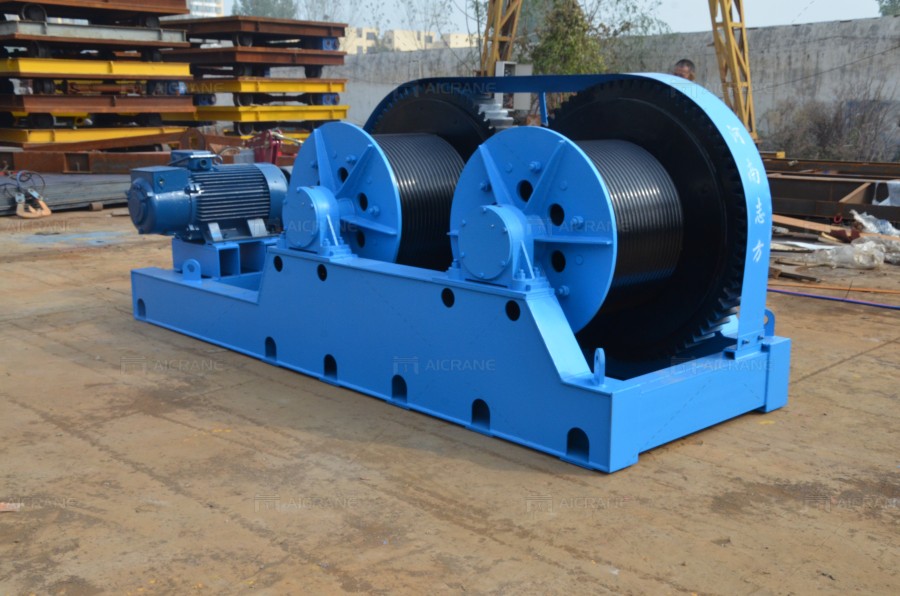
Select the Winch Type
Hydraulic Winches: Ideal for heavy-duty applications. They offer high power and durability but require a hydraulic power source.
Electric Winches: Easier to install and maintain. They run on electric power, making them suitable for less intensive applications.
Location Selection
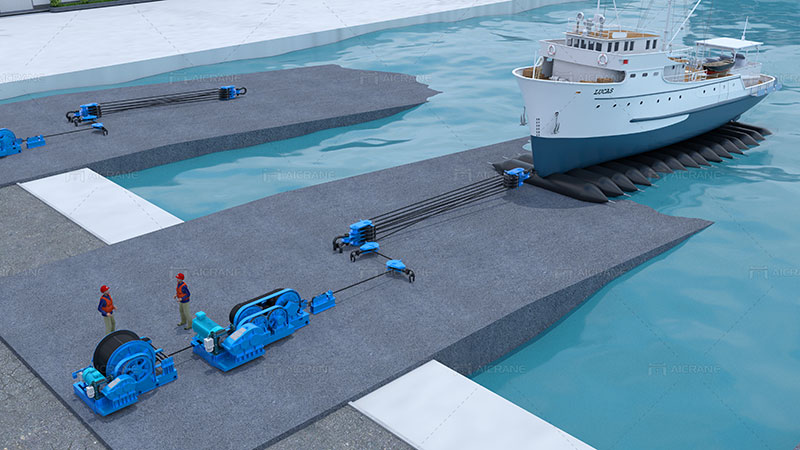
Choose a location that provides a straight line of pull to avoid any angles that could cause operational issues or wear on the cable. Ensure the location is easily accessible for maintenance and operations.
Gather Tools and Materials
Before starting the installation, gather all necessary tools and materials:
- Slipway winch kit: Ensure it includes the winch, cable, and mounting hardware.
- Mounting hardware: Bolts, nuts, washers suitable for the winch and foundation material.
- Tools: Drill, drill bits, wrenches, socket set, measuring tape, level, electrical wiring, and connectors (for electric winches), hydraulic hoses and fittings (for hydraulic winches), safety gear (gloves, safety glasses).
Step 2: Site Preparation
Clear the Area
Clean and Clear: Remove any debris, obstacles, or old equipment from the installation area.
Level the Ground: Ensure the ground is level. If necessary, pour a concrete pad to create a stable and level base. The concrete should be fully cured before proceeding.
Measure and Mark
Mark the Mounting Points: Use the winch base as a template to mark where the holes will be drilled.
Check Alignment: Ensure the marked points are in a straight line with the slipway. Misalignment can lead to operational inefficiencies and increased wear on the equipment.
Step 3: Winch Installation
Drilling and Anchoring
Drill Holes: Drill holes at the marked points using a drill bit suitable for the foundation material (concrete, steel, etc.).
Install Anchors: Insert anchors into the drilled holes. Use appropriate anchors for the material to ensure a secure hold.
Mount the Winch
Position the Winch: Carefully position the winch over the drilled holes, ensuring alignment with the anchors.
Secure the Winch: Use bolts, nuts, and washers to fasten the winch to the foundation. Tighten all bolts evenly to distribute the load and ensure stability. Use a torque wrench to apply the manufacturer’s recommended torque.
Step 4: Electrical or Hydraulic Connections
Depending on whether you have an electric or hydraulic winch, follow the appropriate steps:
Electric Winch
Electrical Wiring: Run electrical wiring from the power source to the winch. Use heavy-duty, weather-resistant cables suitable for outdoor use.
Connect the Winch: Attach the wiring to the winch terminals following the manufacturer’s instructions. Ensure all connections are tight and secure. Use terminal covers to protect against corrosion.
Install a Control Switch: Mount the control switch in a convenient location, such as near the operator’s position. Ensure it is protected from water and debris.
Hydraulic Winch
Hydraulic Hoses: Connect hydraulic hoses from the hydraulic power unit to the winch. Ensure hoses are of appropriate length and securely fastened to avoid kinks or pressure drops.
Check for Leaks: After making connections, run the hydraulic system to check for any leaks. Tighten fittings as necessary and ensure all connections are secure.
Step 5: Testing and Safety Checks
Initial Testing
Power On: Power on the winch and run it without any load to check for proper operation. Listen for any unusual noises and observe the winch’s movement.
Test with Load: Gradually introduce a load to the winch and observe its performance. Ensure the winch pulls smoothly and efficiently without any jerking or slipping.
Safety Checks
Inspect All Connections: Re-check all electrical or hydraulic connections for tightness and security.
Check Mounting Stability: Ensure the winch is firmly mounted and there is no movement or wobbling.
Emergency Stop: Test the emergency stop feature to ensure it functions correctly. Familiarize all operators with its location and operation.
Step 6: Regular Maintenance
To ensure the longevity and optimal performance of your slipway winch, establish a regular maintenance schedule.
Routine Inspections
Visual Inspection: Regularly inspect the winch for any signs of wear, corrosion, or damage. Pay special attention to the cable, hooks, and mounting hardware.
Lubrication: Keep moving parts well-lubricated to reduce friction and wear. Follow the manufacturer’s guidelines for lubrication frequency and type.
Professional Servicing
Annual Servicing: Schedule an annual professional servicing to thoroughly check and maintain the winch machine. This should include a detailed inspection of all mechanical and electrical components.
Address Issues Promptly: Immediately address any issues or irregularities to prevent further damage or safety hazards.
By following these detailed step-by-step instructions, you can ensure a smooth, efficient, and safe installation of your slipway winch. Proper installation and regular maintenance will provide reliable service for years to come, enhancing the efficiency and safety of your boat launching and retrieval operations.